How to Integrate Web Messenger
1. Go to the MindBehind platform
2. Choose the company that your assistant belongs to
3. Click the “Channels” icon
4. Click the “Connect” button for Web Messenger, fill the name field and connect.
Now, you should see the channel you created recently.
5. Go to your assistant by using the “Assistants” tab. Click “View Assistant”.
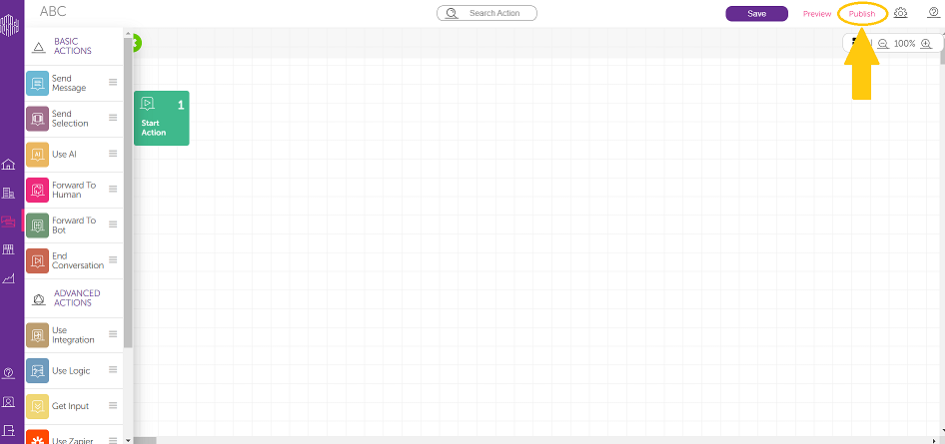
6. In your assistant on the top right corner you will find the section called "Publish", click there.
7. In the deployments tab, you can either create a new deployment by clicking “Add Deployment” button or you can update your already live deployment. Select your web messenger name that you created, choose a proper web messenger channel (you may have many) and choose a right version of your assistant. Assistant Version are the recently saved versions of your assistant. To publish, click the “Publish” button.
Now, you can preview your chatbot from the channels tab.
These are the default design features of the web messenger:
Web Widget Icon:
Company Logo:
Company Name:
Design features of the messenger:
8. To customize your web messenger, follow the first three steps you did before and click the "update" icon.
9. Please fill the following fields on the “DESIGN” tab. For more detailed information:
REMARK: For the image upload fields, only "jpg", "jpeg", "png", "gif" and "svg" files are supported. Your file size should be less than 60 MB.
“Background” : to upload the background image for the conversation.
“Web Widget Icon” : to choose your own widget icon.
“Button Width” and “Button Height” : to set the button dimensions.
“Brand Start Color” : to be used in the messenger header and buttons and media messages. This is the left-side gradient color. ( Purple by default)
“Brand End Color” : to be used in the messenger header and buttons and media messages. This is the right-side gradient color. (Peach shade by default)
“Conversation Color” : to be used for customer messages, quick replies, and actions in the footer. (The default conversation color is black)
Position-related fields are for updating positioning properties.
10. You can also continue to customize by filling related fields under the “SETTINGS” tab. For more detailed information:
REMARK: For the image upload fields, only "jpg", "jpeg", "png", "gif" and "svg" files are supported. Your file size should be less than 60 MB.
"Company Name" : to set a new company name.
“Company Logo”: the logo of the brand that will appear on the icon used to open web messenger and on the web messenger widget window.
“Input Placeholder”: to choose the input placeholder text. (Input place holder text is "Type a message" by default.)
"Input Placeholder Invisibility" switch: to enable the input place holder invisibilty. This property can be selected for only selection module actions, "quickreply" and "card".
Enabled input placeholder invisibility:
“Share Location” switch: to enable the status of location sharing.
“File Upload” switch: to toggle the status of the file upload menu item.
Enabled location share and file upload are placed under the input placeholder:
For authentication, there are three options: Anonymous, One-time password, and Token. Please set it, according to your preference.
For Anonymous option, messenger can start directly without any requirements.
When the "Token" option is selected, “Token Age” should be set in terms of hours.
When the one-time password option is selected, the password related fields are shown.
Customizable Sections
Description fields are used to set the customized texts for the related description fields.
Reminder: To be able to use "Name Input Description" and "Email Input Description" fields, name and email status should be enabled.
“Preferred Country” : to set a predefined country code for the user log-in process.
“Name Status” and “Email Status” switches: to enable or disable the name and email requirements for the user log-in process.
For instance, I set the preferred country as Algeria and I enabled the file, location and input switches:
Endpoint fields are used to set a customized SMS provider.
“Voting Header” : to choose the voting message header text. (The default voting header text is "Rate your conversation")
“Voting Placeholder”: to choose the voting message placeholder text. (The default voting placeholder text is " You can share your feedback with us")
"Voting Message" : to choose the voting message text. (The default voting message text is "How was your experience?")
"Voting Button Text" : to choose voting button text. (The default voting button text is " Submit")
“Ending Conversation Header” : to choose the ending conversation dialog header. (The default ending conversation header text is "End Conversation")
“Ending Conversation Message” : to choose the ending conversation dialog message. (The default ending conversation message text is " Are you sure you want to end your conversation?")
“Confirmation Message” and “Cancellation Message” : to set a confirmation or cancellation message.
(Confirmation message text is "Yes" and cancellation message text is "No" by default.)
Ending conversation function will be activated soon.
"Domain" : to set the location where the widget will work. (It is deployed in MindBehind WebChat by default.)
11. You can preview the web messenger channel from the “Preview” button under the “GETTING STARTED” tab. To be able to use the Web Messenger widget inside your website, you need to copy the script and paste it before the closing tag of your HTML body. You can also add "async" word after the script tag in order for web messenger to load asynchronously with the site itself, it would work faster this way.
Sample format: <script async src="https://cdn.mindbehind.com/sdk/mindbehind-sdk.js?auto=true&key=6172a99645ef3d250778113a"></script>
How to set GDPR approve for Web Messenger Channel:
GDPR Message:
GDPR-OTP Positioning
Start a New Conversation Button
How to Hide Web Messenger
By turning off the show widget selection, designer can hide the widget from all places it is merged into, like web pages and mobiles.
Related Articles
How to Integrate Your Customized SMS Provider with Web Messenger
Recommendation: Check the Web Messenger Integration Editor document. Reminder: To be able to customize the SMS provider the "Authentication" field should be set as "One-time password." Any company can use their SMS provider if they prefer. For the ...How to Customize Web Messenger
Global Parameters These are the parameters that can be added to either JavaScript window object or to URL query parameters, to change something in the layout of web messenger. isFullScreen: if this parameter is set to true, web messenger will start ...How to Use Callout Feature for Web Messenger
Enable Call Out By sliding the toggle in the web messenger editor, the user can choose whether the call out will appear or not. Call Out Text Text: Includes a limit of 150 characters that will be the main call out message. Background Start Color & ...How to Publish Web Messenger by Using Google Tag Manager
About Google Tag Manager (GTM) Google Tag Manager is a free tool that allows you manage and deploy marketing tags on your website or mobile app without having to modify the code. For more information you can visit their website. If you do not have an ...How to integrate a T-Soft store to MindBehind
On Company Management, choose "Integrations" and choose T-Soft. To complete this process, you should already have a T-Soft store. When you see this pop-up, please click on the link to continue configuration. Click on ''Install Now''. Here, you should ...