How to Publish Your Bot on Teams
Prerequisites:

1- Make sure to be the Global admin in the Microsoft Azure portal. Other roles are not able to create a bot.
2- Before publishing Mindbehind bot, make sure to have a healthy bot in Microsoft Azure.
3- After having a healthy Teams bot on Azure, make sure to have MICROSOFT APP ID and MICROSOFT APP PASSWORD.
Registering the Microsoft Teams Bot in Azure:
Make sure to follow all these steps:
https://kb.verba.com/display/docs/Registering+the+Microsoft+Teams+Bot+in+Azure
Creating a bot channel registration
Step 1 - Log in to the Azure portal.
Step 2 - Search for Azure Bot in the search box on the top, then click on the link under the Marketplace section.
Step 4 - Click on the Review + Create button and if the configuration is correct, click on the Create button again. Creating the Azure Bot may take some seconds. Azure will actually create an App Registration and a Bot Service assigned to it.
Adding a Teams Channel to the Bot Service
Step 5 - Once the Bot Channels Registration is completed, search for Bot Services in the search box on the top, then click on the Bot Services link under the Services section.
(Alternatively, the Bot Services can be also found by opening the hamburger menu in the upper right corner, then selecting All services, then the AI + machine learning category.)
Step 6 - Select the Bot Service from the list that was created previously using the name provided at Step 3 (Bot handle).
Step 7 - In the second left panel, under the Bot services section, click on the bot service menu, then click channels inside the bot service.
Step 8 - Under the Add featured channel section, select the Teams icon (Configure Microsoft Teams channel).
Step 9 - Click on the Save button. Agree with the terms of service.
Configuring authentication for the bot
Step 10 - Search for App registrations in the search box on the top, then click on the App registrations link under the Services section.
(Alternatively, the App registrations can be also found by opening the hamburger menu in the upper right corner, then selecting the Azure Active Directory, then selecting App registrations in the left panel.)
Step 11 - Select the App Registration from the list that was created previously using the name provided at Step 3 (Bot handle).
Step 12 - Take a note of the Application (client) ID and the Directory (tenant) ID. They will be needed later.

Step 14 - Under the Client secrets section, click on the New Client Secret button.
Step 15 - Provide a Description, set when the secret Expires, then click on the Add button.
Step 16 - Take a note of the new Client secret. It will be needed later.
Step 17 - In the left panel, under the Manage section, click on the Authentication menu.
Step 18 - Under the Platform configuration sections, click on the Add a platform button.
Step 19 - In the right panel, select Web.
Step 20 - Provide a Redirect URI. It can be any website. Take a note of the URI provided, it will be needed later.
Step 21 - Click on the Configure button in the bottom.
Configuring permissions to the bot
Step 22 - In the left panel, under the Manage section, click on the API permissions menu.
Step 23 - Click on the Add a permission button.
Step 24 - Select Microsoft Graph, then select Application permissions.
Step 25 - Select the following permissions:
- Calendars.Read
- Calls.AccessMedia.All
- Calls.Initiate.All
- Calls.InitiateGroupCall.All
- Calls.JoinGroupCall.All
- Calls.JoinGroupCallAsGuest.All
- OnlineMeetings.Read.All
- User.Read.All
Using the same App Registration for Chat Recording also
The same App Registration can be used for the chat recording. In that case, add the following permissions also:
- Calls.AccessMedia.All
- Calendars.Read
- Calls.Initiate.All
- Calls.InitiateGroupCall.All
- Calls.JoinGroupCall.All
- Calls.JoinGroupCallAsGuest.All
- OnlineMeetings.Read.All
- User.Read.All
- Group.Read.All
- Chat.Read.All
- ChannelMessage.Read.All
- ChannelMember.Read.All
- Directory.Read.All
- Files.Read.All
- Sites.Read.All
If the Chat recording will be used, the protected API access has to be requested. See Protected API Access for Chat Recording section at the bottom.
Step 26 - Click on the Add permissions button.
Granting admin consent to the permissions
Separate Azure tenants for the recording provider (bot) and for the Teams environment to record
In the case when the recorded Teams environment and the recording bot are in separate Azure tenants, the following steps have to be done using the Tenant ID of the Azure tenant where the Teams environment to record resides, and also using a user that has the Teams Service Admin or Global Admin role in that tenant. In order to gather the Tenant ID for
Multi-Tenant configuration:
If the same bot is being used in multiple tenants, then the following steps have to be done for each tenants using the guidelines above.
Step 28 - Build the consent URL. The format is the following:
Replace the {tenant_id} part with the Directory (tenant) ID and ****the {microsoft_app_id} part with the Application (client) ID from Step 14. Replace {redirect_uri} part with the URI from Step 22.
Step 29 - Copy the previously created consent URL into the browser, then hit enter. Log in with a Teams Service Admin or Global Admin user of the Azure tenant where the Teams environment to record resides. Click on the Accept button. The page will redirect to the webpage provided in the Redirect URI setting.
After successfully publishing bot,
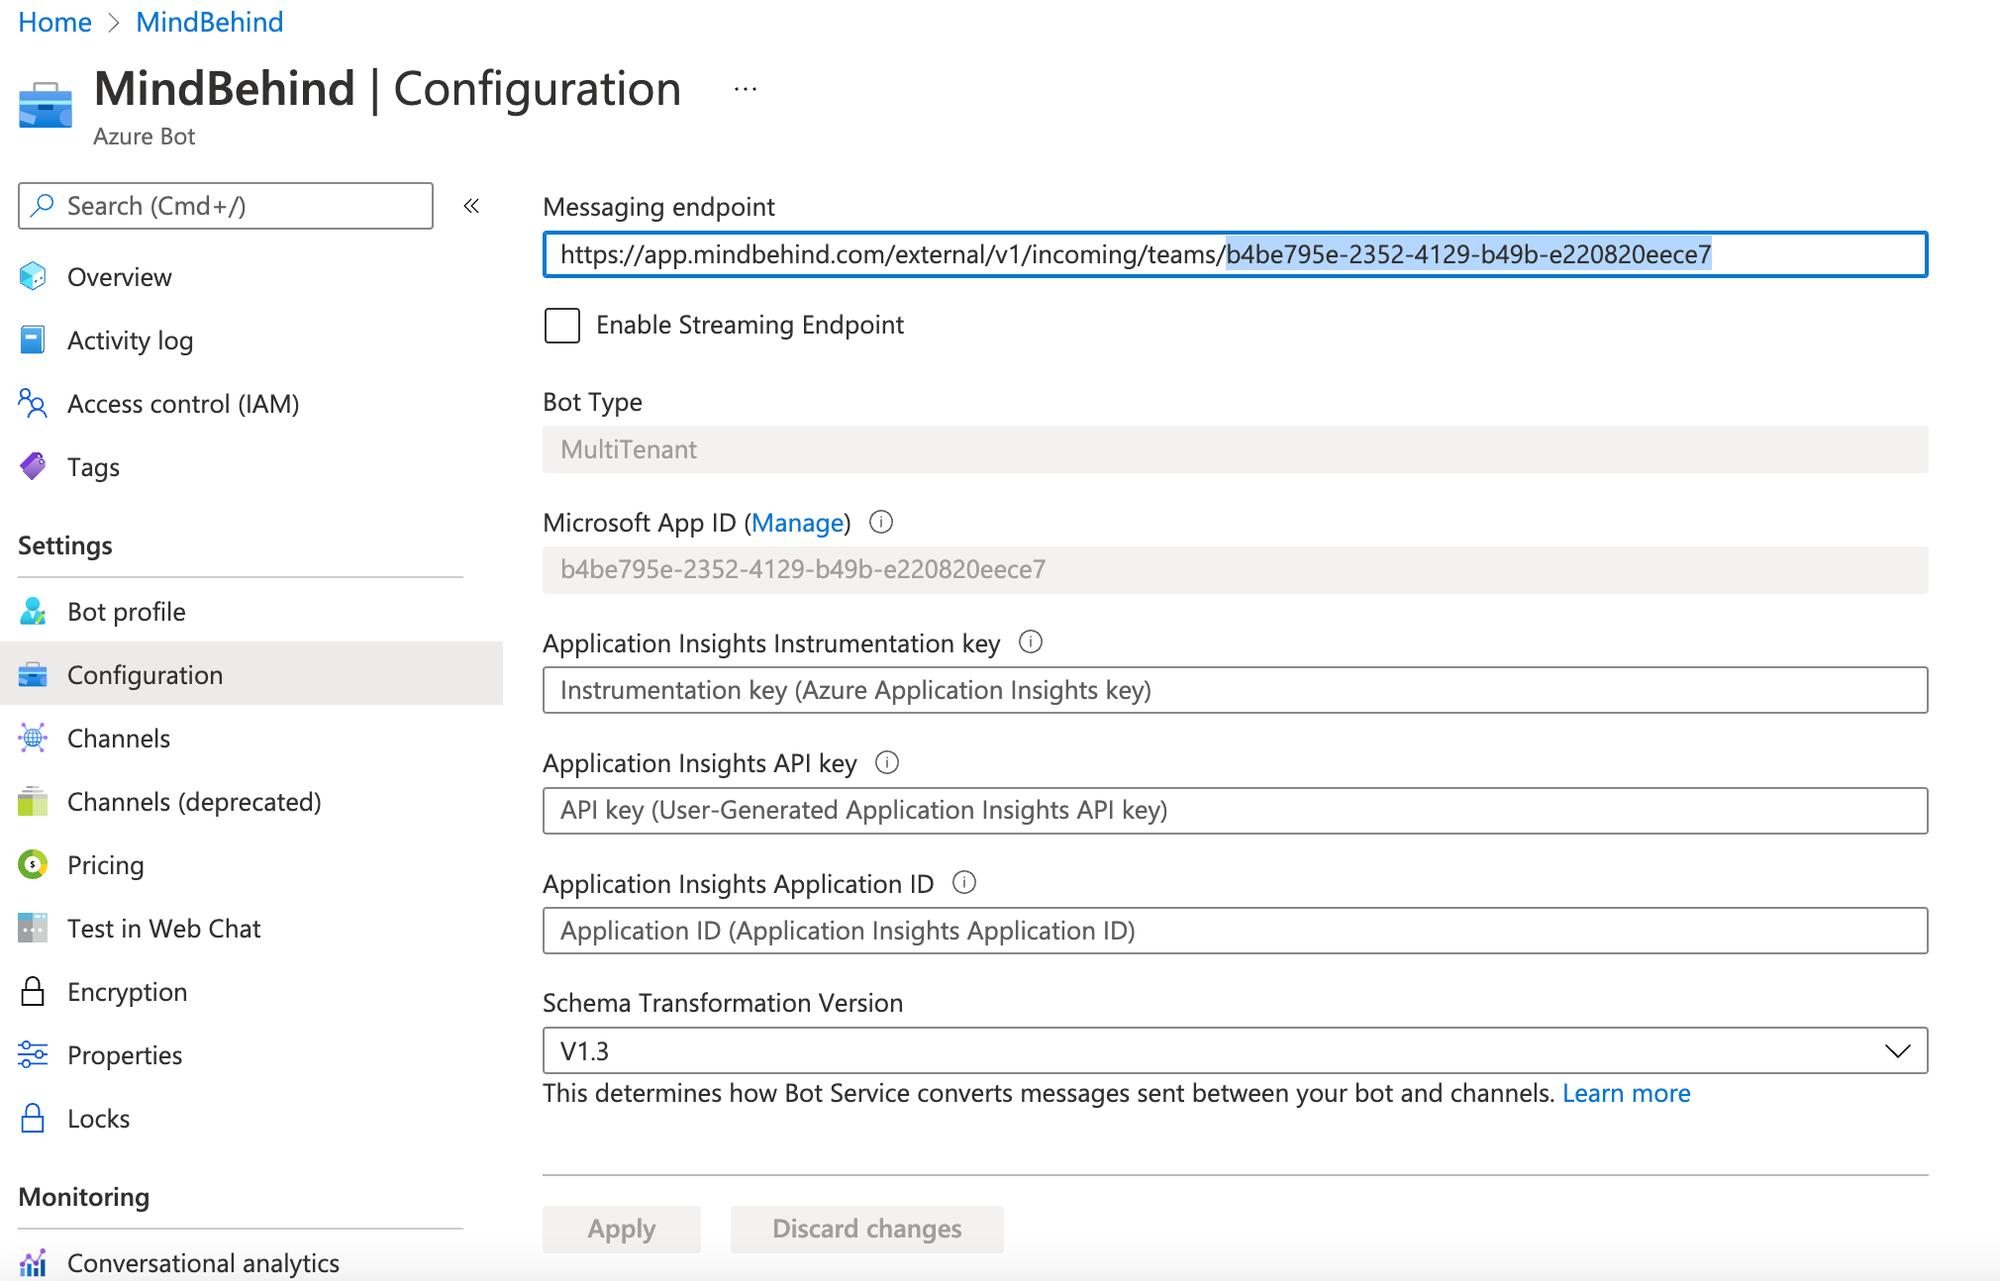
Step 30 - Please visit Configuration page on left menu, add messaging endpoint such as: **https://app.mindbehind.com/external/v1/incoming/teams/{microsoftAppID}** Provide Microsoft App ID that you received on Step 14. You can also see your Microsoft App ID below.
As Mindbehind, we have an endpoint for you to receive your messages through the bot. We just need you to provide messaging endpoint with your app ID.

You can see your bot URL that you can send through teams from Channels tab. You will see your Microsoft Teams Healthy channel and Open in Teams button which redirect you to Teams App:
Setting up the Mindbehind bot for your Teams Business account:
- Go to MindBehind platform.
- Choose the company that your assistant belongs to.
- Click on Channels.
- Select ADD TEAMS
- Add your credentials that you have in Microsoft Azure Bot, such as your APP ID and password (client secret value).

- Go to your assistant.
- Right on the top click ‘Publish’.
- In section ‘Channels’ you can see the pages that you added.
- For the last step, please click the ‘Deployments’ section and press add deployment.
- Select your channel.
- Select the assistant version and press “Publish”.
Congratulations! Your bot is running on your Teams bot as well.
Related Articles
How to Publish your bot on Telegram
Prerequisites: 1- Create a bot using @botfather on Telegram 2- After creating the bot via botfather, take note of the bot username, bot name, and bot token. Creating a bot using botfather Step 1 – Search for the handle @botfather on telegram. Step 2 ...How to Publish your Bot to Instagram
Prerequisites: Before publishing your bot on your Instagram Business account please follow the following steps: First of all, connect your Instagram Business account to a Facebook account. Select Settings from your Instagram account. At the bottom ...Which Message and Card Types Are Supported on Teams?
You can find limitations & details of message types for Teams assistants below. 1- Message Action 1. Send Image Images must be at most 1024×1024 and in PNG or JPEG. 2- Selection Action We can use 2 types of selection action formats for Teams. (Send ...How to Publish Web Messenger by Using Google Tag Manager
About Google Tag Manager (GTM) Google Tag Manager is a free tool that allows you manage and deploy marketing tags on your website or mobile app without having to modify the code. For more information you can visit their website. If you do not have an ...How to connect a chatbot to Facebook Messenger
To publish your chatbot on your Facebook page, make sure that you are admin of this page as a first. To check your role Go to the settings of the page On the left find ‘Page Tasks’ or ‘Page Roles’ Check your role whether it is ‘Admin’. If not, please ...